Tuesday, March 31, 2015

The Container World | Part 7 Building your own Docker Images


In the previous post I gave an overview of Docker and explained what it takes to run a simple container. In this post I will be demonstrating Docker images which provides the basis for running containers. I will go into a bit more detail about what exactly a Docker image is, how to manage your images and also demonstrate how to build an image from scratch and have it store locally on your host.


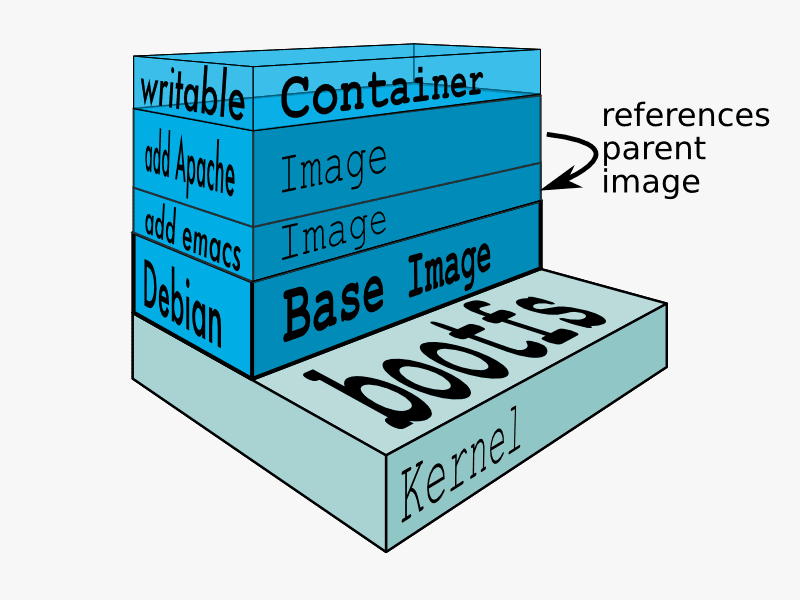
What is a Docker image?


For those of us with familiarity in the virtualization space this might come a bit easier of a concept. A Docker image can be thought of as a template or as source code for all your containers. Docker images provide the building blocks of containers and allow us to define characteristics of containers such as the OS, application and processes running inside the container. Images are what you use to build and launch your containers and is what makes Docker so lightweight and portable. Docker images are what we store in registries that provide us with a git-like functionality of sharing, updating, deploying and storing. There are a few ways of creating images such as by pulling already created images from a repo, creating them from a container or from Dockerfiles.


Managing your Docker images


After learning a bit more about images its easy to see how important it is to manage your images. Docker uses public and private registries to help us easily manage our images. We will just be using the local repo on our host for simplicity reasons of this post.

Search for an image:
    # sudo docker search <image_name>
    # sudo docker search centos

Pull down an image locally from repo:
    # sudo docker pull <image_name>
    # sudo docker pull centos

Push an image to the repo:
    # sudo docker push <image_name>
    # sudo docker push centos

Remove an image:
    # sudo docker rmi <image_name>
    # sudo docker rmi centos


Building a Docker image

This post will demonstrate how to create a custom base image for nginx that you can use to create and run new containers from. This is a way of ensuring that your containers are being created the same and customized to fit your environment and liking. There are a couple of ways doing this. My preferred method is to use Dockerfiles (which will cover in the next tutorial) but for this demo I will be using a custom script written from the Docker Github page (Thanks all you lovely people at Docker!) to build a base image.  Another way of course would be to use the "docker pull" command above. Ill demonstrate how to pull down a Centos image, customize it, and then use it to deploy my containers from. Ill be demonstrating using a Centos 6 host and creating a Centos 6 image for running nginx.

1. Go to the Docker Github page and grab the mkimage-yum.sh file . Please be sure to check out the other scripts Docker has provided for other Host OS and other image distributions.

# wget -O ~/mkimage-yum.sh https://raw.githubusercontent.com/docker/docker/master/contrib/mkimage-yum.sh
--2015-03-31 14:30:03--  https://raw.githubusercontent.com/docker/docker/master/contrib/mkimage-yum.sh
Resolving raw.githubusercontent.com... 199.27.78.133
Connecting to raw.githubusercontent.com|199.27.78.133|:443... connected.
HTTP request sent, awaiting response... 200 OK
Length: 2708 (2.6K) [text/plain]
Saving to: “/root/mkimage-yum.sh”

100%[===================================================================>] 2,708       --.-K/s   in 0s

2015-03-31 14:30:03 (229 MB/s) - “/root/mkimage-yum.sh” saved [2708/2708]


Please note that the mkimage-yum.sh script will actually automatically run a container from the image as well. If you don’t want this just comment out line 106 in the script above:

#docker run -i -t $name:$version echo success


 2. Run the script like below. It will take a minute or two to complete.
# ./mkimage-yum.sh <desire_name_of_image>
# ./mkimage-yum.sh centos6-new

# validate new image is created and imported
# docker images
REPOSITORY          TAG                 IMAGE ID            CREATED             VIRTUAL SIZE
centos6-new         6.6                 61faa3d658e3        22 seconds ago      237.5 MB


3. Once it completes we can create a container from that newly created image. We will be attaching to the container, running the customization stuff and then committing the container into an image that we can use later.
    # docker run -it --name centos6-nginx centos6-new:6.6 /bin/bash


4. The above command will attach you to the running container. So just treat this as you would to install and configure nginx on a normal linux server. I used the following steps to complete customizing my nginx environment.  NOTE: This is where you would be customizing to fit your environment. GO NUTZ!
[root@dba3856e6c99 ~]# ###created the following directories
[root@dba3856e6c99 ~]# mkdir -p /var/www/website/public_html /var/www/website/log /etc/nginx/sites-available
[root@dba3856e6c99 ~]# ###install nginx
[root@dba3856e6c99 ~]# yum install -y nginx
[root@dba3856e6c99 ~]# ###add the following line to nginx.cong file
[root@dba3856e6c99 ~]# vi /etc/nginx/nginx.conf
[root@dba3856e6c99 ~]# tail -2 /etc/nginx/nginx.conf
    include /etc/nginx/sites-available/*;
}
[root@dba3856e6c99 ~]# ###create the virtual host for the website and paste the following text
[root@dba3856e6c99 ~]# vi /etc/nginx/sites-available/website
[root@dba3856e6c99 ~]# cat /etc/nginx/sites-available/website
server {
    server_name website;
    access_log /var/www/website/log/access.log;
    error_log /var/www/website/log/error.log;
    root /var/www/website/public_html;

    location / {
        index index.php;
    }

    # Disable favicon.ico logging
    location = /favicon.ico {
        log_not_found off;
        access_log off;
    }

    # Allow robots and disable logging
    location = /robots.txt {
        allow all;
        log_not_found off;
        access_log off;
    }
}
[root@dba3856e6c99 ~]# ###start and chkconfig the nginx service
[root@dba3856e6c99 ~]# service nginx status
nginx is stopped
[root@dba3856e6c99 /]# echo "service nginx start" >> ~/.bashrc


5. Logout  of the container and check to make sure its exited and no longer running.
# docker ps -a
CONTAINER ID        IMAGE               COMMAND             CREATED             STATUS                     PORTS               NAMES
dba3856e6c99        centos6-new:6.6     "/bin/bash"         21 minutes ago      Exited (0) 2 seconds ago                       centos6-nginx


6. Now we can "commit" that container into an image. We will then be able to use that image to create all of our "new nginx" servers.
# docker commit <container_id> <repo>/<image_name>:<tag> ###NOTE: you can also use -m to document the image and -a to document the author
# docker commit dba3856e6c99 centos6/nginx:6.6
d88af477ead3fd48196fd6e4b65c85990965d30df4732e4c8cd7f07d54de8be6
# docker images
REPOSITORY          TAG                 IMAGE ID            CREATED             VIRTUAL SIZE
centos6/nginx       6.6                 d88af477ead3        8 seconds ago       407.3 MB


centos6-new         6.6                 61faa3d658e3        About an hour ago   237.5 MB


7. To test out the new image, lets run a new container from the image on port 8080 of the host and see if we get a valid website.
# docker run -it -d --name <new-container-name> -p 8080:80 <repo>/<image_name>:<tag> <some_command> ### -d runs in daemon mode (non attached)
# docker run -it -d --name new-nginx -p 8080:80 centos6/nginx:6.6 /bin/bash

Go the host IP address on port 8080 in our web browser to validate you get a screen that looks like the one below.
http://your-ip-address:8080


If you can see it then you have made it!


Hopefully this has given a good overview of Docker images as it is one of the most important aspects of Docker. In the next tutorial Ill demonstrate how to create an image but using a Dockerfile which is my preferred method.

Thursday, March 26, 2015

Host Collections and Bulk Actions within Katello

This is a continuation of the previous post (Creating Products and Repositories within Katello). This post will show some of the power that Katello provides.The following steps will demonstrate how to create a Host Collection. Host Collections provide the ability to group multiple Content Hosts together based on needs or criteria such as function or environment. Once a Host Collection is created and Content Hosts are pulled in you are able to run bulk actions against the entire host collection or a selected few. The actions include: Package install, remove and update ; Errata install ; changing Lifecycle or content view (don’t see a whole lot of advantage of the 3rd one, yet).

**Before you can take advantage of the Bulk actions, you must install the katello-agent on each content host. The agent will run as goferd service. You will actually need both the pulp and the katello repositories to install it successfully and possibly software collections. I added the Katello and Pulp repos into my product to make life easier and in the event I need to update the agent.

See the following links for more information on installing the repos based on your OS.


Then do a yum install: yum install –y katello-agent

You will see agent install and goferd start. You will then be able to utilize Bulk Actions with Host Collections!


Creating Host Collection

1. Within your desired Organization and Location, create a new Host Collection.
Hosts > Host Collections > + New Host Collection


2. Add Content Hosts to the New Host Collection. You should see your Content Host you registered in the previous Demo here.
Hosts > Host Collections >Select your Host Collection > Content Hosts > Add > check desired hosts > Add Selected


3. Once you have added your desired Content Hosts to the Host Collection you can now run Collection Actions against the Host Collection. Will demo a package install.
Hosts > Host Collections >Select your Host Collection >Collection Actions >Package Installation, Removal, and Update


                NOTE: you can select certain content hosts within the host collection if needed.


4. Uncheck content hosts that you want to bypass if any, type the name of the package and then click Install, Update or Remove. You will be notified when completes.


Its that easy! I think this is an extremely powerful and quick way to handle package management across your infrastructure. Although we have things like Puppet or Ansible that also has the abilities to do this in bulk as well, I think that this is still a nice feature to take advantage of. Please note that once you create a new host collection you can now automate the process of adding content hosts to host collections. Go back into your Activation Key you used from the previous tutorial and add the Host Collection to that Activation Key. We will start to dive into automating and provisioning in the upcoming tutorials and piece all of this together so you can have complete automated control over your infrastructure with Foreman, Puppet and Katello.

Wednesday, March 11, 2015

Creating Products and Repositories within Katello

The following article will cover how to create Products and Repositories within the Katello project. There are several components that must be performed ahead of time in order to make repo management simple. Steps below are for creating custom products and does not cover Red Hat repositories. A couple definitions before we begin.

Products - Products are a collection of repositories and content within Katello. This is what you will subscribe your content hosts to in order to access these repositories.


Content Hosts - Content Hosts is a fancy way of saying clients. These are the client machines that you are registering to products (using subscription manager) and what consumes the repositories. Katello has the ability to store information about each Content Host and initiate package tasks using the katello-agent which will be covered later.


Creating a Product


1) Within your desired Organization and Location, create a new product. As mentioned, a product is a collection of repositories. so you will register your hosts to a Product and that will enable you to access repositories within that Product.
Content > Products > +New Product

2) Fill in the Name and Label and Save it.


3) Once the new product is created, create a new repository.
Click Create Repository


4) Fill out the form to create a new repository. We will create a Yum repo for this example. Using the Puppet repo since it contains a small number of packages to save disk space. Please note that you can create several different types of Repos within products but I am only demonstrating yum. Save when done.   


5) Now sync the packages to the Product. Note that you can setup a scheduled sync plan for the repos.
Click on the Repository > Sync Now


6) Create a new activation key for the newly created product so you can register content hosts without a password. 
Content > Activation Keys > +New Activation Key


7) Subscribe the New Product Product to the newly created Activation Key.
Content > Activation Keys > RecentlyCreatedKey > Subscriptions > Add > Select New Product Product from list > Add Selected


8) You can now register content hosts (clients) to the newly created product. Use the following steps to register content hosts to products. The steps are done from the content host itself.

            A) Install subscription manager on the content host if not already installed:
# wget -O /etc/yum.repos.d/subscription-manager.repo ; yum install -y subscription-manager

B) Install the Katello server CA.
# rpm -Uvh http://your.foremanlink.com/pub/katello-ca-consumer-latest.noarch.rpm

C) Register to the Product using the activation Key.
# subscription-manager register --org="YOUR-ORG" --activationkey="activationkey" #example above key is “NewProductActivationKey”


9) You should now see the repository or repositories from the content host. Run “yum repolist” to validate. You will also see the content host populate from the Foreman web UI. You will be able to install anything from the repo using yum on the content host.


This documentation only covers the basis for creating products, repositories and registering content hosts to Products. In the next doc I will demonstrate how to  manage packages from the Web UI and how to create host collections to run bulk package actions against several hosts at a time. This is where you start to see the power of Katello and package management for your infrastructure. 

Installing the Foreman/Katello Project on CentOS 6.6

This article will cover the basic/default installation of Foreman project with the Katello plugin. We will be installing the most stable releases of Foreman (1.7), Katello (2.1), and Puppet to date of this article. We will not be using the nightly releases as I have found them to be buggy and inconsistent. Foreman provides the main interface for all the projects and handles the provisioning, monitoring and dashboard capabilities of your environment and the Katello project manages customized repositories and package management to all registered content hosts (will cover more of that in the next articles). Let's Begin!


Installing Foreman with Katello on Centos 6.6


1) Ensure that your hostname resolves correctly in DNS. Had a problem with the hostname that I had to resolve by correcting entries in the /etc/hosts file and also in the /etc/sysconfig/network file. Check ‘hostname -f’ against nslookup/host on other machines. Just be sure that you have consistency between your host and other devices on your network as puppet will not be happy if you don't!

2) Turn off iptables and ip6tables. Atleast during the installation process. It will make your life easier! Consult the Foreman documentation if you can't and need information on specific ports etc.
    
    # service iptables stop ; chkconfig iptables off
    # service ip6tables stop; chkconfig ip6tables off

3) Disable selinux. Pulp (service that runs inside Katello) and selinux aren’t currently playing nice. Open /etc/sysconfig/selinux in a text editor and set to disabled.

4) Install the following repos/versions. I didn't have luck with the nightly's so I did not use them.

   # rpm -ivh http://yum.puppetlabs.com/puppetlabs-release-el-6.noarch.rpm
    # rpm -ivh http://dl.fedoraproject.org/pub/epel/6/x86_64/epel-release-6-8.noarch.rpm
    # yum install -y http://yum.theforeman.org/releases/1.7/el6/x86_64/foreman-release.rpm
    # wget http://dev.centos.org/centos/6/SCL/scl.repo -O /etc/yum.repos.d/scl.repo
    # yum install -y https://fedorapeople.org/groups/katello/releases/yum/2.1/katello/RHEL/6Server/x86_64/katello-repos-latest.rpm

5) Install Katello packs and grab a cold one. ~400 packages
    # yum install -y katello

6) Deploy Katello. This is install the defaults. See "katello-installer --help" for additional parameters and custom settings.
    # katello-installer

This will take several minutes to complete (so grab another cold one!). At this point though it will either fail or succeed. It will give you progress along the way and tell you why it failed in the event it does. On successful completion you should see something like below:

[root@hostname ~]# katello-installer
Installing             Done                                               [100%] [.]
  Success!
  * Katello is running at https://hostname.example.com
      Initial credentials are admin / mfmVBo6M7yFenvAp
  * Capsule is running at https://hostname.example.com:9090
  * To install additional capsule on separate machine continue by running:"

      capsule-certs-generate --capsule-fqdn "$CAPSULE" --certs-tar "~/$CAPSULE-certs.tar"

  The full log is at /var/log/katello-installer/katello-installer.log


This concludes the default installation process of Foreman with the Katello plugin. This is enough to get you going with the WEB UI and start poking around. There will be follow up blog posts that examine and explain the aspects of the project that make it so powerful.